Overview
The Act: [ID] page provides details on the account selected from the Accounts page. Use the Act: [ID] page to review the outstanding balance summary, transaction activity, and collection activity on a guarantor account.
It is comprised of 6 tabs:
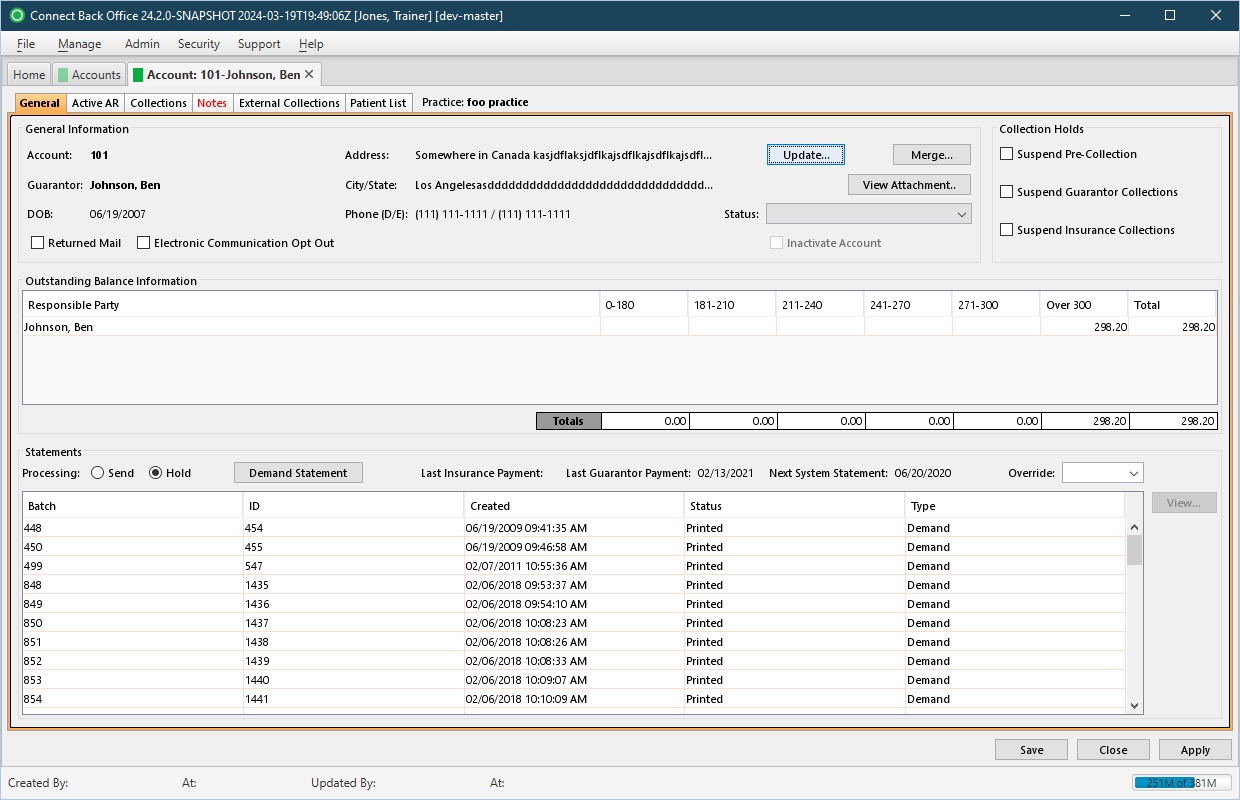
The General tab provides a summary of the outstanding balance on the account, including the current responsible party on the account.
Field Definitions
Field | Type | Required | Description |
|---|---|---|---|
| General Information Section | The section includes the account number, guarantor name, current address, and the day/evening telephone number of the primary contact on the account. | ||
| Account | Display Only (Pulled from created/updated Accounts/Persons) | Yes | The guarantor account number. |
| Guarantor | Display Only (Pulled from created/updated Accounts/Persons) | Yes | The name of the guarantor. |
| DOB | Display Only (Pulled from created/updated Accounts/Persons) | No | The date of birth of the guarantor of the account. |
| Address | Display Only (Pulled from created/updated Accounts/Persons) | Yes | The street address of the guarantor. |
| City/State | Display Only (Pulled from created/updated Accounts/Persons) | Yes | The city, state, and zip code of the guarantor. |
| Phone (D/E) | Display Only (Pulled from created/updated Accounts/Persons) | No | The 10-digit telephone numbers (Day/Evening) of the primary contact on the account. |
| Returned Mail | Checkbox | No | Sets the flag to indicate mail has been returned on the account and follow-up is needed. |
| Electronic Communication Opt Out | Checkbox | No | If checked, it designates the client has opted to not receive text/electronic communications. This checkbox sets the preference at the account level, but it can also be set at the facility level. |
| Status | Drop Down | No | The values in the drop down list assist in grouping and searching for accounts. Each practice must create and associate their own Account Status values on the Admin > Account Status page. |
| Inactivate Account | Checkbox | No | If checked, the account is inactivated in Connect. A system note is created: "Inactivated Account: {Account Name]". If the field is unchecked for an inactive account, the account is reactivated and a system note is created: "Reactivated Account: {Account Name]". An account cannot be inactivated if there is an outstanding balance. Inactive accounts:
User must have the Activation permission to inactivate/reactive an account. |
| Collection Holds Section | The section includes options for holding pre-collections and collections actions on the account. | ||
| Suspend Pre-Collections | Checkbox | No | If selected, disallows any service fee line from qualifying for Pre-Collections, even if the account meets pre-collections selection criteria. |
| Suspend Guarantor Collections | Checkbox | No | If selected, disallows any service fee line from qualifying for Guarantor Collections, even if the account meets guarantor collections selection criteria. |
| Suspend Insurance Collections | Checkbox | No | If selected, disallows any service fee line from qualifying for Insurance Collections. |
| Outstanding Balance Information Section | The section reports the outstanding balance for each responsible party according to the aging intervals defined for the practice, for example, 30, 60, and 90 days, as shown in the following example:
| ||
| Statements Section | The section contains processing options for financial statements, control for generating a statement, and the list of statements that have been generated on the account. If the account has a payment plan, the minimum amount due will be included on the statement at its normal frequency unless the statement is suspended. | ||
| Processing | Radio Selection | Yes | The option controls whether statements are generated on the account. By default, the option is set to Send. Options include:
|
| Last Insurance Payment | Read-only | Yes | Displays the last insurance payment date. |
| Last Guarantor Payment | Read-only | Yes | Displays the last guarantor payment date. |
| Next System Statement / Override | Read-only / Calendar Date | Yes / No | The system will generate a statement for the account on the Next System Statement date. If you wish to generate the next statement on a date prior to or after the Next System Statement date, select or enter a date in the Override field. |
| Generated Statements Table | Display Only (pulled from generated statements data) | Yes | Generated statements are listed in a table with the following column headings:
|
Button Descriptions
Button | Shortcut Keys | Description | Step-By-Step Guides |
|---|---|---|---|
| Update | [Alt] + [U] | To open the Update Person window to modify the person records with name, address, and contact information changes. |
|
| Merge | [Alt] + [E] | To open the Merge Account [ID] window to modify the person record with name, address, and contact information changes. This button is only enabled for users given the Account - Merge right on the Roles page. | |
| View Attachment | [Alt] + [V] | Open the Image Viewer page to display or add an attachment. |
If the account has any attachments, open the Set ID drop down list and select the attachment to view. If no attachments currently exist, a new attachment can be added to the account record by scanning or importing the image and attaching it. |
| Demand Statement | [Alt] + [D] | To generate a statement before the regularly scheduled statement cycle. | Generating Demand Statement |
| View | [Alt] + [V] | To view a particular statement. |
|