Complete this task to generate a statement before the regularly scheduled statement cycle.
You can define what information is included in the demand statement. The demand statement is printed for the individual account and can include either the current activity for open balances only or historical activity for all balances.
Step-By-Step Guide
Step | Instructions | Additional Information |
|---|---|---|
| 1 | From the Act: [ID] > General tab, verify the Send option is selected. If not, select Send. The Demand Statement button is also available from the Collections / Guarantor / General sub-tab. |
Make sure your default printer is set up and ready to print statements. |
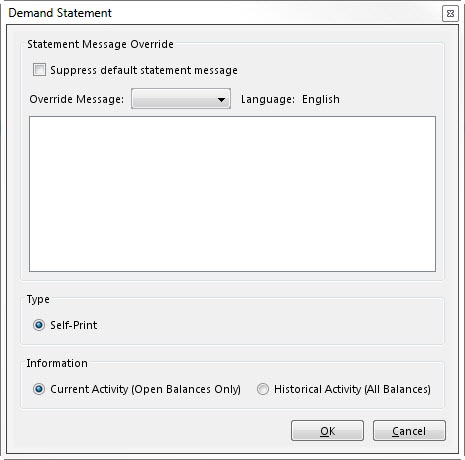
| 2 | Click Demand Statement. The Demand Statement window opens.
| |
| 3 | (Optional) Update the statement message via the following actions:
| The message tied to the statement override message appears in the text box. This message will replace the statement message on this statement only. You can modify the text as needed. If you do not select an override message, the system automatically sends the message indicated on the Practice: [ID] > Statements > Statement Message [day range] field. |
| 4 | Update the Type selection to define how to print the demand statement: Self-Print or Statement Service. | The Statement Service option is not available if the practice does not use a statement service provider. |
| 5 | Update the Information option to determine the information to include in the demand statement: Current Activity (Open Balances Only) or Historical Activity (All Balances). | |
| 6 | Click OK. The statement appears in the default preview window. | |
| 7 | Print the statement from the preview window. |
Act: [ID] / External Collections Tab
Update Person / Person Information Tab
Update Person / Address History Tab
Applying Service Line Adjustments
Rebilling Claims with Fee Changes
Rebilling Claims without Fee Changes
Reversing Miscellaneous Adjustments
Reassigning Financial Responsibility
Transferring Service Fee Lines to Internal Collections
Transferring Service Fee Lines to External Collections
Canceling Pre-Collections on Service Fee Lines
Suspending Pre-Collections Eligibility Status on a Specific Service Fee Line
Holding Statements on Specific Service Fee Lines
Generating the Remit Detail Report
Printing the Account AR Activity
Not applicable for this topic