Overview
The Payment Batch: Import page is used to manage Electronic Remittance Advice (ERA) files for insurance payments.
It contains a list of ERA files received from payers. Use the page to import distributions from the ERA file into a payments batch. A payment batch is created for each ERA file that is imported. Any ERA file containing distributions not positively identified are reported as unresolved distributions. All unresolved distributions must be resolved before they can be imported. Unresolved payments are a result of claims for which the distribution is not positively identified in the ERA file. Some distributions might include warnings. Warnings do not have to be resolved before the payments can be imported.
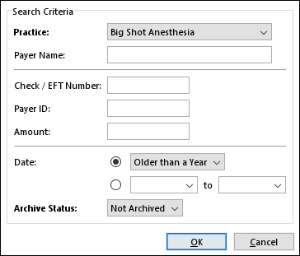
The Search Criteria window includes the Archive Status options to filter search results by archived ERA files or all ERA files. The label on the button under the Download button will be either Archive or Unarchive based on the filter selection. Archived files cannot be imported and are excluded from error checking. Archived ERA files do not have values in the Unresolved and Warnings columns.

Field Definitions
Field | Type | Required | Description |
|---|---|---|---|
| Practice | Display Only (pulled from ERA file) | Yes | The practice associated with the payment batch. |
| ERA ID | Display Only (pulled from ERA file) | Yes | The identification number assigned to the ERA file when it is imported into a payment batch. |
| Payer Name | Display Only (pulled from ERA file) | Yes | The name of the payer who sent the ERA file. |
| Check/EFT Number | Display Only (pulled from ERA file) | Yes | The unique check number or electronic funds transfer (EFT) identification of the ERA file. |
| Payer ID | Display Only (pulled from ERA file) | Yes | The unique payer identification number (REF 2U value of the ERA file). |
| Override Payer ID | Display Only (pulled from Override values) | No | The unique payer identification number entered/populated in the Override > Override ID > Payer ID field. |
| File Name | Display Only (pulled from ERA file) | Yes | The name of the electronic remittance advice file. |
| Date | Display Only (pulled from ERA file) | Yes | The date on the check or ERA file. By default, the table is sorted by this column in ascending order. |
| Amount | Display Only (pulled from ERA file) | Yes | The total amount of the check or electronic funds transfer for the ERA file. |
| Distributions | Display Only (pulled from ERA file) | Yes | The total number of payments, recoups and denials from the payer. |
Button Descriptions
Button | Shortcut Keys | Description | Step-By-Step Guides |
|---|---|---|---|
| Search | [Alt] + [S] | To find ERA file. |
|
| Download | [Alt] + [D] | To download the ERA file from the clearinghouse to output data from the ERA file to the standard Medicare EOB form through the Medicare Easy Print software. |
|
| Archive / Unarchive | [Alt] + [A] | To archive the specified ERA file(s). By default, the label on the button is Archive. This label is based on the selection in the Archive Status filter.
|
|
| Import | [Alt] + [P] | To import the insurance distributions in the ERA file into a payment batch. |
|
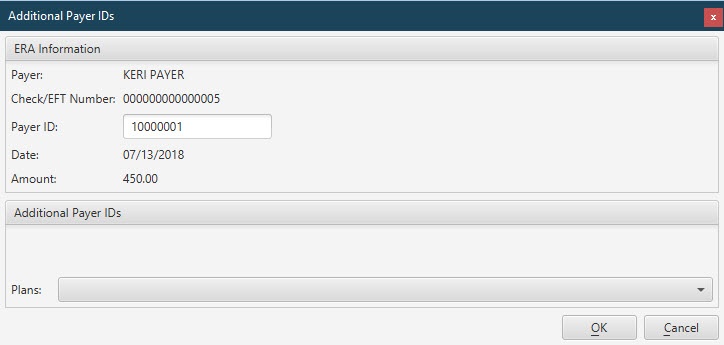
| Override | [Alt] + [O] | To override the Payer ID value. This may be necessary if an ERA does not contact a Payer ID value, or you wish to override the existing value. If the ERA file did not contain a REF 2U value and the Payer ID column is blank, the system will not allow the ERA to be imported. You must click Override and enter/select the appropriate Additional Payer ID value. If a Payer ID value existed prior to overriding, the previous value will remain in the Payer ID column and remain attached to the file for historical purposes. The Additional Payer IDs value will be used to process the ERA. |
|
| Print Remit | [Alt] + [T] | To generate the Remit Detail report, which mimics the information presented on the Claim Detail tab of the Medicare Remit Easy Print software. This option lists the claim detail for all Electronic Remittance Advice (ERA) service line transactions rolled into a single payment. It also displays denial and adjustment code descriptions in the summary section near the end of the report. |
|