Complete this task to create a collection action or action series for guarantor and insurance collection tasks.
Collection task actions can be monitored for the account from the Act: [ID] > Collections tab.
Step-By-Step Guide
Step | Instructions | Additional Information |
|---|---|---|
| 1 | From the Guarantor or Insurance tab, select the guarantor account to create an action. | |
| 2 | Click the account or service fee line to add an action. The sub-tabs update with the information for the selected line item. | |
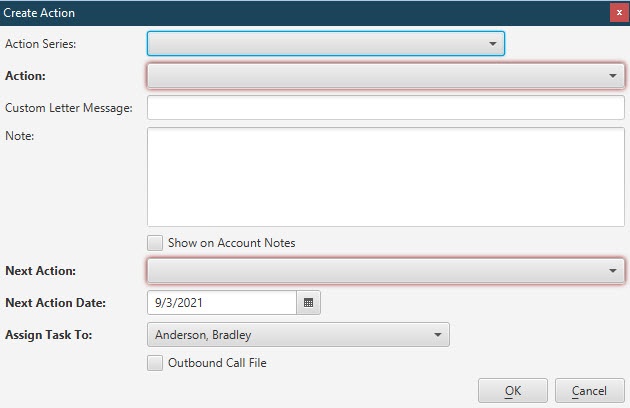
| 3 | In the Collection Actions section at the bottom of the page, click Create. The Create Action window opens.
| |
| 4 | (Optional) If adding an action series, open the Action Series drop down list and select a series. | After selecting a series, the Action and Next Action fields will auto-populate with the actions defined in the series. The default options can be changed. The options in the Action Series and Action drop down lists are created and managed from the Collections Admin / Actions & Action Series tab. |
| 5 | Open the Action drop down list and select an action. | If you previously selected an Action Series, the Action field will auto-populate with the first action from that series. The default option can be changed. If you do not select an Action Series above, you must select an Action in this step. |
| 6 | (Optional) Enter the Custom Letter Message content. | If the collection letter associated with the selected Action Type includes the {{Custom_Message}} data field, the Custom Letter Message field is enabled for input. The entered message will appear in the letter where the {{Custom_Message}} data field is in the Letter text pane. |
| 7 | (Optional) In the Note field, enter a description or explanation of the action. | |
| 8 | (Optional) Select the Show on Account Notes checkbox if you'd like the note entered in the Note field copied and displayed on the Account/Notes tab. | If there are enterprise or practice rules set for Account Notes, they will override this checkbox. |
| 9 | Open the Next Action field and update the action to be performed after the created action. | The Next Action Type field defaults to a value if an Action Series is selected above. The defaulted value can be changed if needed. |
| 10 | Open the Next Action Date field and the due date. | The Next Action Date field defaults to a value if an Action Series is selected above. The defaulted value can be changed if needed. |
| 11 | (Optional) Open the Assign Task To drop down list and select a user to assign the task. | If you enter a different collector in the Assign Task To field, the collection effort for that account is now assigned to them. |
| 12 | (Optional) Select the Outbound Call File checkbox if the action being created is to generate an outbound call file to send to Revenue Advantage. | This field is only available for Guarantor actions. |
| 13 | Click OK to save the action. The Create Action window closes, and the action appears in the Collection Actions list. | To cancel without saving, click Cancel. |
| 14 | If the created action is linked with a collection letter, the letter automatically generates when the created action is saved. You may print the letter by highlighting the action and clicking Print Letter in the Collection Actions sub-tab. | If an Action Series is created with a collection letter, the letter also automatically generates, but will not display in the list of current actions in the Collections Actions sub-tab. The letter can be accessed and printed from the Manage / Collection Letters page. |
Not applicable for this topic