Use this task to manage cases in the Connect Mobile Assistant (CMA) app.

It is important to remember when creating a case, you must be the user to submit the case. CMA does not have the ability to transfer cases to another to finish and/or submit it.


Step-By-Step Guide

Step

Instructions

Additional Information

1Creating Cases
2

Select New Case (+) from the Home screen.


3

From the Edit Case screen, enter the case data.

  • Required fields are managed in CONNECT Back Office.
  • Required fields for Apple® users are marked with a red asterisk *.
  • Required fields for Android™ users are set in bold text.
  • If a crosswalk is set, the ASA Code automatically populates based on CPT Code. If multiple crosswalks exist, the ASA code needs to be manually selected.
  • To change a default that is displayed for that specific case, tap the field.
  • Use the green plus sign to add additional data, such as providers, CPT codes, or images.
  • Use the red X to remove data.
4Setting Favorites and Defaults

Use favorites and defaults to simplify entering commonly used data in new cases.

Favorites and defaults are configured during case creation.

5

To assign data as a favorite, tap the star once. 

  • A yellow star denotes favorites.
  • There can be multiple favorites.
  • Setting favorites allows you to use Prev and Next to switch between favorites.
  • A favorite can be de-selected by tapping the star.
6

To assign data as a default, tap and hold the star for approximately 2 seconds.


  • A yellow star with a green checkmark denotes defaults.
  • There can only be one designated default.
  • Defaults are populated when tapping the associated field.
  • A default can be de-selected by tapping the star.
7Validating Cases

Before a case can be submitted to Back Office, it must pass case validation. Validation verifies that all required fields are entered and any conflicting data is removed.

8

Tap the Validate option at the top of the case.
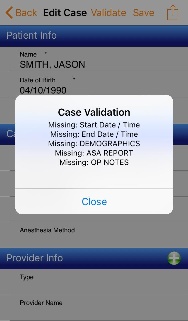
  • Visible and Required fields are managed in CONNECT Back Office.
  • The validation message will provide details on any field missing data needed in order to send the case.
9Review the information and click Close.
10Make any necessary updates before submitting.
If the case does not pass validation, it cannot be submitted from CMA.
11Submitting Cases
12

Once a case has been validated, submit it to CMA by tapping the case from the case list and selecting Submit Case.

IconDescription
Case is ready for submission.
Case is ready and has been flagged for submission.
Case has been submitted to Back Office.
Case has been released and Charge has been submitted from Back Office.
Error. Has not passed validation.
  • Cases cannot be modified or deleted once they have been submitted.
  • Multiple cases can be submitted at once by flagging. To flag a case, tap the icon and tap Flag Case. To submit flagged cases, tap the case and select Submit Flagged.
  • Submitted and Released cases will be removed from your case list after 7 days.


Related Training/Support Documentation

Not applicable for this topic

Search this documentation

  • No labels