Use this task to modify the EDC interface for a practice.
Step-By-Step Guide
Step | Instructions | Additional Information |
|---|---|---|
| 1 | From the EDC Interface Configurations page, select the EDC interface to be modified. | |
| 2 | Click Update. The EDC Interface Configuration: [name] page opens. Update the relevant information via the applicable steps below... | |
| 3 | In the General section, enter the name being given to the EDC interface configuration. | |
| 4 | (Optional) To copy the member number to the subscriber number, check the Copy Member Number to Subscriber Number option. | |
| 5 | In the Batch Cases by section, select the applicable option. This determines if charge batches are auto-created and what cases are included in each charge batch. | |
| 6 | If the EDC file:
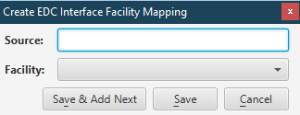
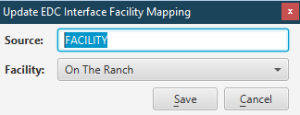
| If the source file includes facilities, each facility must be mapped in the Facility Mapping section. If the source file does not include one or more facilities, you must select a default facility when configuring the general information. The practice and facility is unique to the EDC interface configuration. If the facilities are not mapped, the EDC file will not be parsed correctly in Connect Back Office. An existing facility mapping can be updated by:
|
| 7 | Open the Mapping Element drop down list and select the element to map. | The field defaults to Payer and does not need to be updated if mapping payers. |
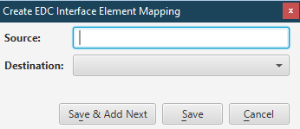
| 8 | To map an element in the Element Mapping section:
| Complete this task to map the elements affiliated with the practice to the like data in the EDC file, for example, payers to payers and referring physicians to referring physicians. The elements vary based on the hospital. If an element is not mapped in the EDC interface configuration, data for that element will not be mapped in the EDC file in Connect Back Office. This data must be entered manually on the case. An existing element mapping can be updated by:
|
| 9 | Click Apply. | |
| 10 | Click Save to save the changes and close the page. |

Not applicable for this topic