Use this task to create a new guarantor account. Creating an account also creates a person record in Connect.
The account configuration includes information collected on the following tabs:
Step-By-Step Guide
Step | Instructions | Additional Information |
|---|---|---|
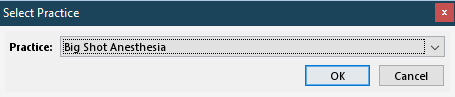
| 1 | Upon selecting File > New > Account, the Select Practice window opens.
| This task can also be initiated by clicking Create from the Accounts page. |
| 2 | Open the Practice drop down list and select the practice to associate the new account. | |
| 3 | Click OK. The Create Account / Person Information tab opens. | |
| 4 | Person Information Tab From the Create Account / Person Information tab, enter the new account information. | |
| 5 | In the Name and Address section, enter the name of the person in the Name field. | Last and First names are required for a person name, with the Middle and Suffix field being optional. |
| 6 | Select the International Address checkbox, if applicable. |
|
| 7 | Enter of the street address for the person in the Address line 1 and line 2 fields, if applicable. | |
| 8 | Enter the zip code for the person in the Zip Code field. | If International Address is selected, the State and Zip Code fields are replaced with Postal Code, Provide Code, and Country. |
| 9 | (Optional) Enter the name of the city for the person in the City field. | The City field auto-populates based on the value entered for the Zip Code field, but can be updated, if necessary. |
| 10 | (Optional) Open the State drop down list and select the state for the person. | The State field auto-populates based on the value entered for the Zip Code field, but can be updated, if necessary. |
| 11 | Enter the business hours phone number for contacting the person in the Day Phone field. | |
| 12 | Enter the non-business hours phone number for contacting the person in the Evening Phone field. | |
| 13 | Enter the person's electronic mail address for the person in the Email field. | |
| 14 | In the Employer Information section, enter the name of the person's current employer in the Employer field. | Employer information is optional and used for your record keeping. |
| 15 | Enter of the street address for the person's employer in the Address line 1 and line 2 fields, if applicable. | |
| 16 | Enter the zip code for the person's employer in the Zip Code field. | |
| 17 | (Optional) Enter the name of the city for the person's employer in the City field. | The City field auto-populates based on the value entered for the Zip Code field, but can be updated, if necessary. |
| 18 | (Optional) Open the State drop down list and select the state for the person's employer. | The State field auto-populates based on the value entered for the Zip Code field, but can be updated, if necessary. |
| 19 | Enter the phone number of the employer in the Phone and Ext. fields, if applicable. | |
| 20 | Enter the facsimile number of the employer in the Fax and Ext. fields, if applicable. | |
| 21 | In the Personal Information section, enter the person's SSN in the Social Security field. | |
| 22 | Open the Gender drop down list and select the person's gender. | |
| 23 | Open the Date of Birth drop down and select the date from the calendar. | The date can also be entered manually by typing the date with the following format: mm/dd/yyyy. |
| 24 | Open the Marital Status drop down list and select the person's marital status. | |
| 25 | Open the Language drop down list and select the person's spoken language. | |
| 26 | Open the Employment drop down list and select the person's current employment status. | |
| 27 | Enter the person's current occupation in the Occupation field. | |
| 28 | Insurance Tab Click the Insurance tab to add the insurance details. |
|
| 29 | In the Active Insurance section, click Add. | Refer to the Adding Insurance topic for the step-by-step guide for completing this activity. |
| 30 | Click Save to save and close the page. | The Account: [ID] / Active AR tab for the newly created account is displayed. |
Related Training/Support Documentation
Not applicable for this topic