Complete this task to import images into an image set from another source (for example, e-mail) that are related to charges or payments. For example, you might import an image of an encounter form, anesthesia record, or pre-authorization notice into an image set for a case image batch. For example, you might import an image of a check, explanation of benefits (EOB) or deposit ticket into an image set for payment image batch.
For case image batch, you can specify a facility or date of service for the charge batch, which will be used as the default values in the charge batch. All new cases added to this charge batch will have the facility, date of service, or both that was specified in the case image batch.
Documents can be imported into new image sets or existing image sets of a case or payment image batch.
Step-By-Step Guide
To Specify the Default Values
Step | Instructions |
|---|---|
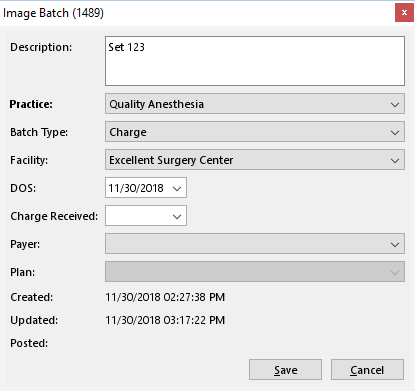
| 1 | From the Image Viewer page, click the Batch Details icon (
|
| 2 | Complete the applicable options to specify a facility, date of service, or both for the case image batch. This information will be used as the default values in the charge batch for all new cases.
|
| 3 | Continue to Import Image task. |
To Import Documents into a New Image Set
Step | Instructions |
|---|---|
| 1 | From the Image Viewer page, click Create Set. A set is created with a unique identification number and is displayed in the Set ID list. |
| 2 | Click the Import (
|
| 3 | Go to the folder that contains the images to import into the image set for the image batch, and then select the images. You can click one or more images to import. |
| 4 | Click Open. The status of the scanning process appears, displaying the number of scanned images completed, the number of images that are being uploaded to the server, and the number of images that are downloaded in the preview pane. Each image is sequentially numbered as the image is uploaded to the server. When the documents are scanned, the images appear as sequentially numbered thumbnails in the thumbnail pane. Use the scroll bar to view the images. |
| 5 | Verify that the image quality of the scanned images is satisfactory and that the image set is complete with the images that you want in the image set. To view an image, click the thumbnail of the image. The image appears in the preview pane on the right. Use the Scale options to magnify the image or to adjust the page magnification in the preview pane.
|
| 6 | Repeat steps above for each image set to add to the image batch. |

To Import Documents into an Existing Image Set
Step | Instructions |
|---|---|
| 1 | From the Image Viewer page, open the Set ID drop down list and select the image set to which to add documents. |
| 2 | Click the Import (
|
| 3 | Go to the folder that contains the images to import into the image set for the image batch, and then select the images. You can click one or more images to import. |
| 4 | Click Open. The status of the scanning process appears, displaying the number of scanned images completed, the number of images that are being uploaded to the server, and the number of images that are downloaded in the preview pane. Each image is sequentially numbered as the image is uploaded to the server. When the documents are scanned, the images appear as sequentially numbered thumbnails in the thumbnail pane. Use the scroll bar to view the images. |
| 5 | Verify that the image quality of the scanned images is satisfactory and that the image set is complete with the images that you want in the image set. To view an image, click the thumbnail of the image. The image appears in the preview pane on the right. Use the Scale options to magnify the image or to adjust the page magnification in the preview pane.
|
| 6 | Repeat steps above for each image set to add to the image batch. |
Not applicable for this topic