Complete this task to create a new dashboard in Portal, customized with preferred layout and selected widgets.
Step-By-Step Guide
Instructions | Additional Information | |
|---|---|---|
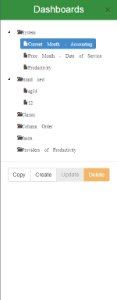
| 1 | From the Dashboard tab, click Manage. The Dashboard sidebar opens.
| |
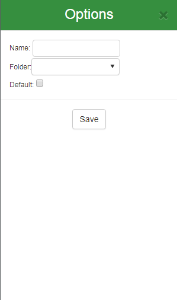
| 2 | Click Create. The Options sidebar opens.
|
|
| 3 | Enter the Dashboard Name. | |
| 4 | Open the Folder drop down and select the folder to save the Dashboard. | These will be folders in which you have permissions to access. |
| 5 | (Optional) Mark the Default checkbox to make this Dashboard the default view when logging in and accessing Portal, or clicking the Dashboard tab. |
|
| 6 | Click Save. The list of available widgets is displayed.
|
|
| 7 | Click a Widget Name to add it to the Dashboard.The widget is added to the Dashboard layout and the change is automatically saved. | Widgets displayed on the Dashboard in the order added. To change the order, click and drag the widget to the desired location and click Save. To remove a widget from the Dashboard, click the X in the upper right corner of the widget and click Save. |
| 8 | Click X in the upper right corner of the Options sidebar and close it. |

Related Topics
Related Training/Support Documentation