Complete this task to export a refund check and print it in a third-party accounting program.
Connect Back Office supplies the check information from the related refund transaction for printing the refund check.
If the payee in the export file does not exist in your accounting program, Back Office adds the payee to your customer list. If the payee name is longer than 41 characters, the name is truncated to the first 41 characters and sent to the accounting program. The truncated name will be printed on the refund check unless you change it in your accounting program before printing the checks.
Back Office retrieves the check numbers assigned to each payee from the accounting program and records them on the Refunds page for the transactions after the refund transactions are posted in Back Office. The refund checks are then ready to be printed from your accounting program.
Step-By-Step Guide
Step | Instructions | Additional Information |
|---|---|---|
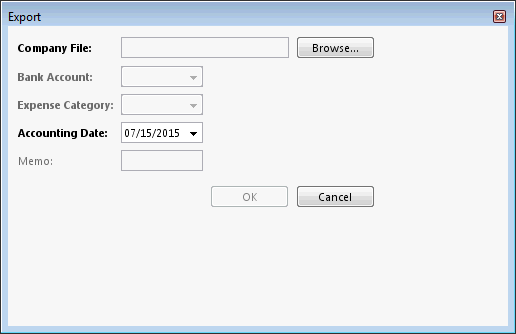
| 1 | From the Refunds page, select the transaction, or transactions, to export and click Export. The Export window opens.
| |
| 2 | Enter the Company File. | The path to the data file of your third-party accounting program. This information is required and must be entered each time you export check information. If you know the path to the data file, type the path in the space provided. If not, click Browse to find the data file. Before running the export process, this file must exist in your accounting program. |
| 3 | Open the Bank Account dropdown list and select the account from which the refund check is being written, for example, Checking Account. | The account from which the check will be drawn. Before running the export process, at least one bank account must be created in your accounting program. |
| 4 | Open the Expense Category dropdown list and select the category to which this refund transaction is being recorded. | The expense account to which the refund will be associated in your business account program. This information is populated from the expense category setup of your business accounting program. |
| 5 | Enter the Accounting date. | The Accounting date is the date to use for this transaction. If your practice is configured for accounting dates, the Accounting date option is available. If your practice is not configured for accounting dates, this option is not available and the step is skipped. |
| 6 | (Optional) Enter a message in the Memo field to print on the refund check. | |
| 7 | Click OK to export the file to your third-party accounting program. | Depending on how you configured Back Office access to the Company File in your accounting program, you may need to start the program and then allow Back Office access to the Company File. When the process is completed, the export confirmation message appears informing you of the check numbers for each payee who is receiving a refund check, and the refund transactions are posted. The Check Number, Performed By, and Performed At columns in the Refunds table are updated to reflect the check number entered and the person who posted the refund transaction and date/time the transaction was posted. |
| 8 | Print the checks from your accounting program. |
Not applicable for this topic