Complete this task to create a new dashboard in Portal, customized with preferred layout and selected widgets.
Step-By-Step Guide
Instructions | Additional Information | |||
|---|---|---|---|---|
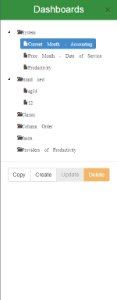
| 1 | From the Dashboard tab, click Manage. The Dashboard sidebar opens.
| |||
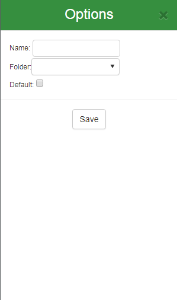
| 2 | Click Create. The Options sidebar opens.
|
| ||
| 3 | Enter the Dashboard Name. | |||
| 4 | Open the Folder drop down and select the folder to save the Dashboard. |
| ||
| 5 | (Optional) Mark the Default checkbox to make this Dashboard the default view when logging in and accessing Portal, or clicking the Dashboard tab. |
| ||
| 6 | Click Save. The list of available widgets is displayed.
|
| ||
| 7 | Click a Widget Name to add it to the Dashboard.The widget is added to the Dashboard layout and the change is automatically saved. |
| ||
| 8 | Click X in the upper right corner of the Options sidebar and close it. |

| Panel | ||||||
|---|---|---|---|---|---|---|
| ||||||
| Panel | ||||||||
|---|---|---|---|---|---|---|---|---|
| ||||||||
Video: Not applicable for this topic |
Search this documentation
| Livesearch | ||
|---|---|---|
|