Step | Instructions | |
|---|
| 1 | Creating Cases |
|
| 2 | Select New Case (+) from the Home screen. 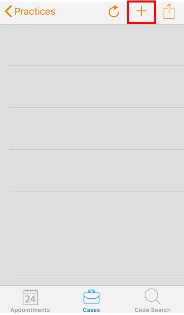
|
|
| 3 | From the Edit Case screen, enter the case data. 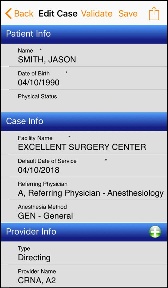
|
| Note |
|---|
- Required fields are managed in CONNECT Back Office.
- Required fields for Apple® users are marked with a red asterisk *.
- Required fields for Android™ users are set in bold text.
- If a crosswalk is set, the ASA Code automatically populates based on CPT Code. If multiple crosswalks exist, the ASA code needs to be manually selected.
- To change a default that is displayed for that specific case, tap the field.
- Use the green plus sign
 to add additional data, such as providers, CPT codes, or images. to add additional data, such as providers, CPT codes, or images. - Use the red X
 to remove data. to remove data.
|
|
| 4 | Setting Favorites and Defaults | Use favorites and defaults to simplify entering commonly used data in new cases. Favorites and defaults are configured during case creation. |
| 5 | To assign data as a favorite, tap the star once. 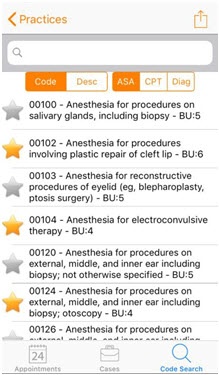
|
| Note |
|---|
- A yellow star denotes favorites.
- There can be multiple favorites.
- Setting favorites allows you to use Prev and Next to switch between favorites.
- A favorite can be de-selected by tapping the star.
|
|
| 6 | To assign data as a default, tap and hold the star for approximately 2 seconds.  |
| Note |
|---|
- A yellow star with a green checkmark denotes defaults.
- There can only be one designated default.
- Defaults are populated when tapping the associated field.
- A default can be de-selected by tapping the star.
|
|
| 7 | Validating Cases | Before a case can be submitted to Back Office, it must pass case validation. Validation verifies that all required fields are entered and any conflicting data is removed. |
| 8 | Tap the Validate option at the top of the case. 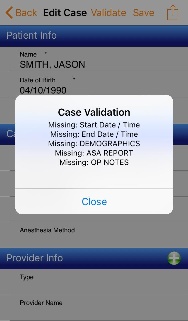
|
| Note |
|---|
- Visible and Required fields are managed in CONNECT Back Office.
- The validation message will provide details on any field missing data needed in order to send the case.
|
|
| 9 | Review the information and click Close. | |
| 10 | Make any necessary updates before submitting. |
| Note |
|---|
| If the case does not pass validation, it cannot be submitted from CMA. |
|
| 11 | Submitting Cases |
|
| 12 | Once a case has been validated, submit it to CMA by tapping the case from the case list and selecting Submit Case. 
|
| Icon | Description |
|---|
 | Case is ready for submission. |  | Case is ready and has been flagged for submission. |  | Case has been submitted to Back Office. |  | Case has been released and Charge has been submitted from Back Office. |  | Error. Has not passed validation. |
| Note |
|---|
- Cases cannot be modified or deleted once they have been submitted.
- Multiple cases can be submitted at once by flagging. To flag a case, tap the icon and tap Flag Case. To submit flagged cases, tap the case and select Submit Flagged.
- Submitted and Released cases will be removed from your case list after 7 days.
|
|