Overview
| Panel | |||||||||||||||||
|---|---|---|---|---|---|---|---|---|---|---|---|---|---|---|---|---|---|
| |||||||||||||||||
|
Field Definitions
Function | Type | Required | Description | ||||||
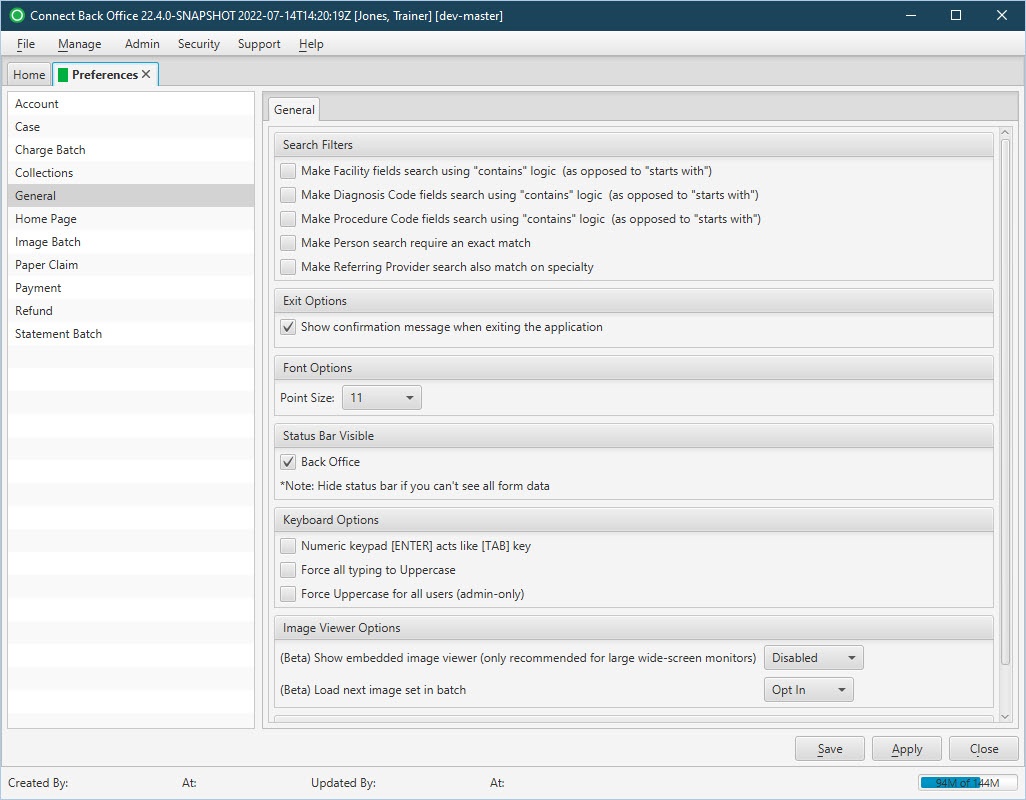
| Search Filters Section | |||||||||
| Make Facility fields search using "contains" logic (as opposed to "starts with") | Checkbox | No | Includes search results that contain any portion of the typed input.
| ||||||
| Make Diagnosis Code fields search using "contains" logic (as opposed to "starts with") | Checkbox | No | Includes search results that contain any portion of the typed input.
| ||||||
| Make Procedure Code fields search using "contains" logic (as opposed to "starts with") | Checkbox | No | Includes search results that contain any portion of the typed input.
| ||||||
| Make Person search require an exact match | Checkbox | No | Limits search results to only those that match the typed input exactly.
| ||||||
| Make Referring Provider search also match on specialty | Checkbox | No | Search results are limited to only those that agree with the selected name input options (above) AND the specialty filter type matches the specialty listed on a potential provider's Back Office provider profile. | ||||||
| Exit Options Section | |||||||||
| Show confirmation message when exiting the application | Checkbox | No | Determines whether a confirmation message appears when the user exits the application. By default, this option is checked. | ||||||
| Font Options Section | |||||||||
| Point Size | Drop Down | Yes | Determines how large or small letter and number characters will appear in the application. The larger the Point Size, the larger the characters. By default, this option is set to 11. | ||||||
| Status Bar Visible Section | |||||||||
| Back Office | Checkbox | No | Toggles the Status Bar at the bottom of the Back Office application window. By default, this option is checked; however, in some instances it may be beneficial to hide the Status Bar, e.g., if you can't see all form data. | ||||||
| Keyboard Options Section | |||||||||
| Numeric keypad (ENTER) acts like (TAB) key | Checkbox | No | Forces the [ENTER] key on the number pad of keyboard (not the [ENTER] key in the alpha-character area) to behave as the [TAB] key. This makes for easier tabbing through fields when entering data. | ||||||
| Force all typing to Uppercase | Checkbox | No | This option sets all typing to uppercase, regardless of whether Caps Lock is enabled. Note: This also includes case data being created from an EDC. Note: When entering text in Account / Notes, it will appear as you type it, but will update to uppercase after clicking OK. | ||||||
Force all typing to Uppercase throughout instance (Note: This option is available to admin users only.) | Checkbox | No | This option can only be set by administrators only, but if selected, forces all users in the instance to use uppercase text throughout the application. It cannot be overridden by individual users. If this option is not selected by the Admin, individual users can set their own preference via the Force all typing to Uppercase option. | ||||||
| Image Viewer Options Section | |||||||||
| Show embedded image viewer (only recommended for large wide-screen monitors) | Drop Down | Yes | Determines whether the embedded image viewer in both charge entry pages and the coding form is:
Note: Even if you opt to embed the Image Viewer, you may also access it in a separate window by going to File > Launch Image Viewer. | ||||||
| Load next image set in batch | Drop Down | Yes | If selected, upon opening an Image Set, the next image set in the batch automatically begins to download in the background. *This process facilitates a quicker image load time when navigating to the next image set during Charge and Payment Entry activities.
| ||||||
| Disable Scanning | |||||||||
| Disable scanning support | Checkbox | No | If selected, the Scanner drop down field is disabled on the Image Viewer page.
|