Overview
| Panel | |||||||||||||||||||||||
|---|---|---|---|---|---|---|---|---|---|---|---|---|---|---|---|---|---|---|---|---|---|---|---|
| |||||||||||||||||||||||
|
(Click an image below to enlarge.)
Practice: New Page / General Practice Information Tab
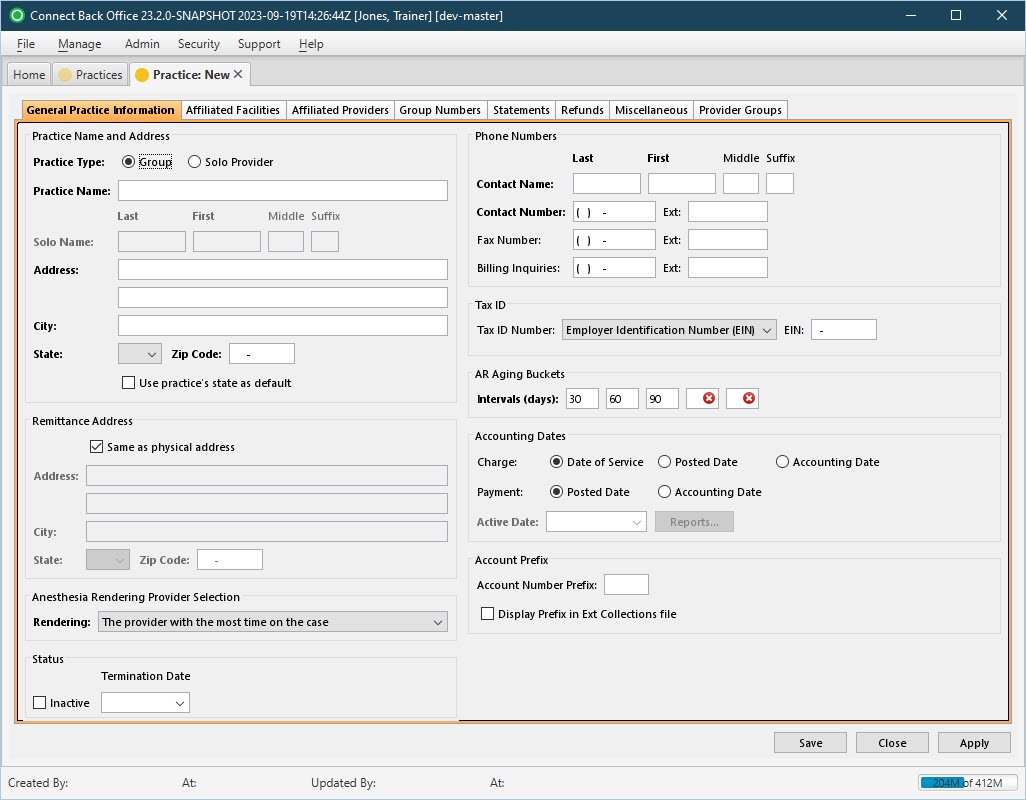

Practice: [name] Page / General Practice Information Tab


Field Definitions
Field | Type | Required | Description |
|---|---|---|---|
| Practice Name and Address Section |
| Practice Type | Radio Selection | Yes | Identifies if the practice includes a group of providers or an individual physician. The options include:
|
| Practice Name | Free Text | Yes | The name of the practice. The name must be unique. The practice name will be used on billing statements, claims, various reports, and documents. If the Practice Type is Group, enter the name of the group who owns the practice. |
| Solo Name | Free Text | Yes | The Last, First, and Middle names of the provider who owns the practice. A Suffix, for example, Sr., Jr., or III, can also be entered, if applicable. This information is required if the Practice Type is Solo Provider. The provider name will be used on billing statements, claims, various reports, and documents. Enter the name of the provider who owns the practice. |
| Address | Free Text | Yes | The street address of the practice, including lines 1 and 2. The practice address is printed on the billing statement unless the remittance address is provided. |
| City | Free Text | Yes | The city where the practice is located. The field will auto-populate when the Zip Code is entered. However, the field can be edited by typing the name of the city in the space provided. |
| State | Drop Down | Yes | The two-character state abbreviation of the practice address. The field will auto-populate when the Zip Code is entered. However, the field can be edited by typing the state abbreviation or selecting an option from the drop down list. |
| Zip Code | Free Text | Yes | The five-digit plus 4-digit postal code where the practice is located. |
| Use practice's state as default | Checkbox | No | Specifies whether the state of the practice will be the default value for all states entered when creating records that require a state. By default, this checkbox is not selected. |
| Remittance Address Section |
| Same as physical address | Checkbox | No | Specifies the address for remitting payments is the same as the physical address of the practice. If checked, the remittance address fields are read-only and populated with the practice address details. If the practice is configured for the remittance address and the plan requires the physical address to be sent in the 2010AA loop of the electronic claim file, set the Address option of Plan Claim Options on the Claims tab in the plan configuration. |
| Address | Free Text | Yes | The address used on the paper claim form. The remittance address appears on billing statements, claims, various reports, and documents for the practice. |
| City | Free Text | Yes | The city for the remittance address. The field will auto-populate when the Zip Code is entered. However, the field can be edited by typing the name of the city in the space provided. |
| State | Drop Down | Yes | The two-character state abbreviation of the remittance address. The field will auto-populate when the Zip Code is entered. However, the field can be edited by typing the state abbreviation or selecting an option from the drop down list. |
| Zip Code | Free Text | Yes | The five-digit plus 4-digit postal code of the remittance address. |
| Anesthesia Rendering Provider Selection Section |
| Rendering | Drop Down | Yes | The provider who will be specified as the billing provider when a claim is generated. The selected option determines the configuration of the Provider Time in Connect Back Office. The options include:
|
| Phone Numbers Section |
| To configure or modify the primary contact and telephone numbers for the practice. | |||||
| Contact Name | Free Text | Yes | The Last, First, and Middle names of the primary contact at the practice. A Suffix, for example, Sr., Jr., or III, can also be entered, if applicable.
| ||
| Contact Number | Free Text (Numeric) | Yes | The 10-digit telephone number and extension, if applicable, of the primary contact at the practice. | ||
| Fax Number | Free Text (Numeric) | No | The 10-digit telephone number and extension, if applicable, of the fax machine at the practice. | ||
| Billing Inquiries | Free Text (Numeric) | No | The 10-digit telephone number and extension, if applicable, used to direct billing inquiries for the practice. This number is included on guarantor statements. | ||
| Tax ID Section |
| To record or modify the tax number used by the practice. | |||
| Tax ID Number | Drop Down / Free Text | No | The Employer Identification Number (EIN) or Social Security Number (SSN) used as the tax identification number for the practice. Select the one that applies, then enter the value in the space provided. The options include:
|
| AR Aging Buckets Section |
| To configure or modify intervals for aging account receivables. | |||
| Intervals (days) | Free Text (Numeric) | Yes | The number of days for aging accounts receivables. By default, the aging buckets are based on 30-day intervals: 30-60-90-120-180. This information is mainly used for reporting purposes. For example, a report that lists your accounts receivables will be organized according to these aging buckets. These values must be positive whole numbers and increment according to the first interval value. For example, if 15 is entered as the first interval, the second interval must be greater than 15. |
| Accounting Dates Section |
| Charge | Radio Selection | Yes | Determines dates for recording charges in Connect Back Office and reporting them in Connect Portal. Charges will be included in a report as long as the date falls within the date of service, posted, or accounting date specified when the report is generated in Portal.
| ||||
| Payment | Radio Selection | Yes | Determines dates used for recording payments in Connect Back Office and reporting them in Connect Portal. Payments will be included in a report as long as the date falls within the posted or accounting date specified when the report is generated in Portal.
| ||||
| Active Date | Date (mm/dd/yyyy) | No | The date used as the accounting date for accepting new charges and payments in Connect Back Office. This field is enabled and required if the Accounting Date option is selected for either Charge or Payment. Use this date as an effective date for when charges or payments can be accepted in charge or payment entry in Back Office.
| ||||
| Account Prefix Section |
| To configure an account prefix to populate on statements and collection letters. | |||
| Account Number Prefix | Free Text | No | If used, populates an account number prefix on all statements and collection letters. Up to three alpha-characters can be entered in this field. |
| Display Prefix in Ext Collections files | Checkbox | No | If selected, the account number prefix displays on the External Collections export files. |
Button Descriptions
Button | Shortcut Keys | Description | Step-By-Step Guides | ||
|---|---|---|---|---|---|
| Reports | [Alt] + [R] | To generate common end-of-month financial reports. |
|